
SS ONE - Trek Speed Concept
Custom Cockpit Measurement Guide
Built Around You. Designed for Your Position.
Every SS ONE cockpit is individually designed around your forearm dimensions, hand position and preferred aerodynamic riding position.
To ensure your cockpit is manufactured to your specifications, please follow this guide carefully and record all required measurements before placing your order.
All measurements must be provided in millimetres (mm).
Before You Begin
You will need:
A flexible measuring tape
A ruler or measuring tape
A suitable tool for measuring bolt diameter
Assistance from another person where possible
Important: Take all positional measurements in your intended aerodynamic riding position. Maintain a consistent arm, wrist and hand position throughout the process.
Where possible, have another person assist with measurements to improve accuracy.
1. Mounting Bolt Diameter — BD
Measurement: BD
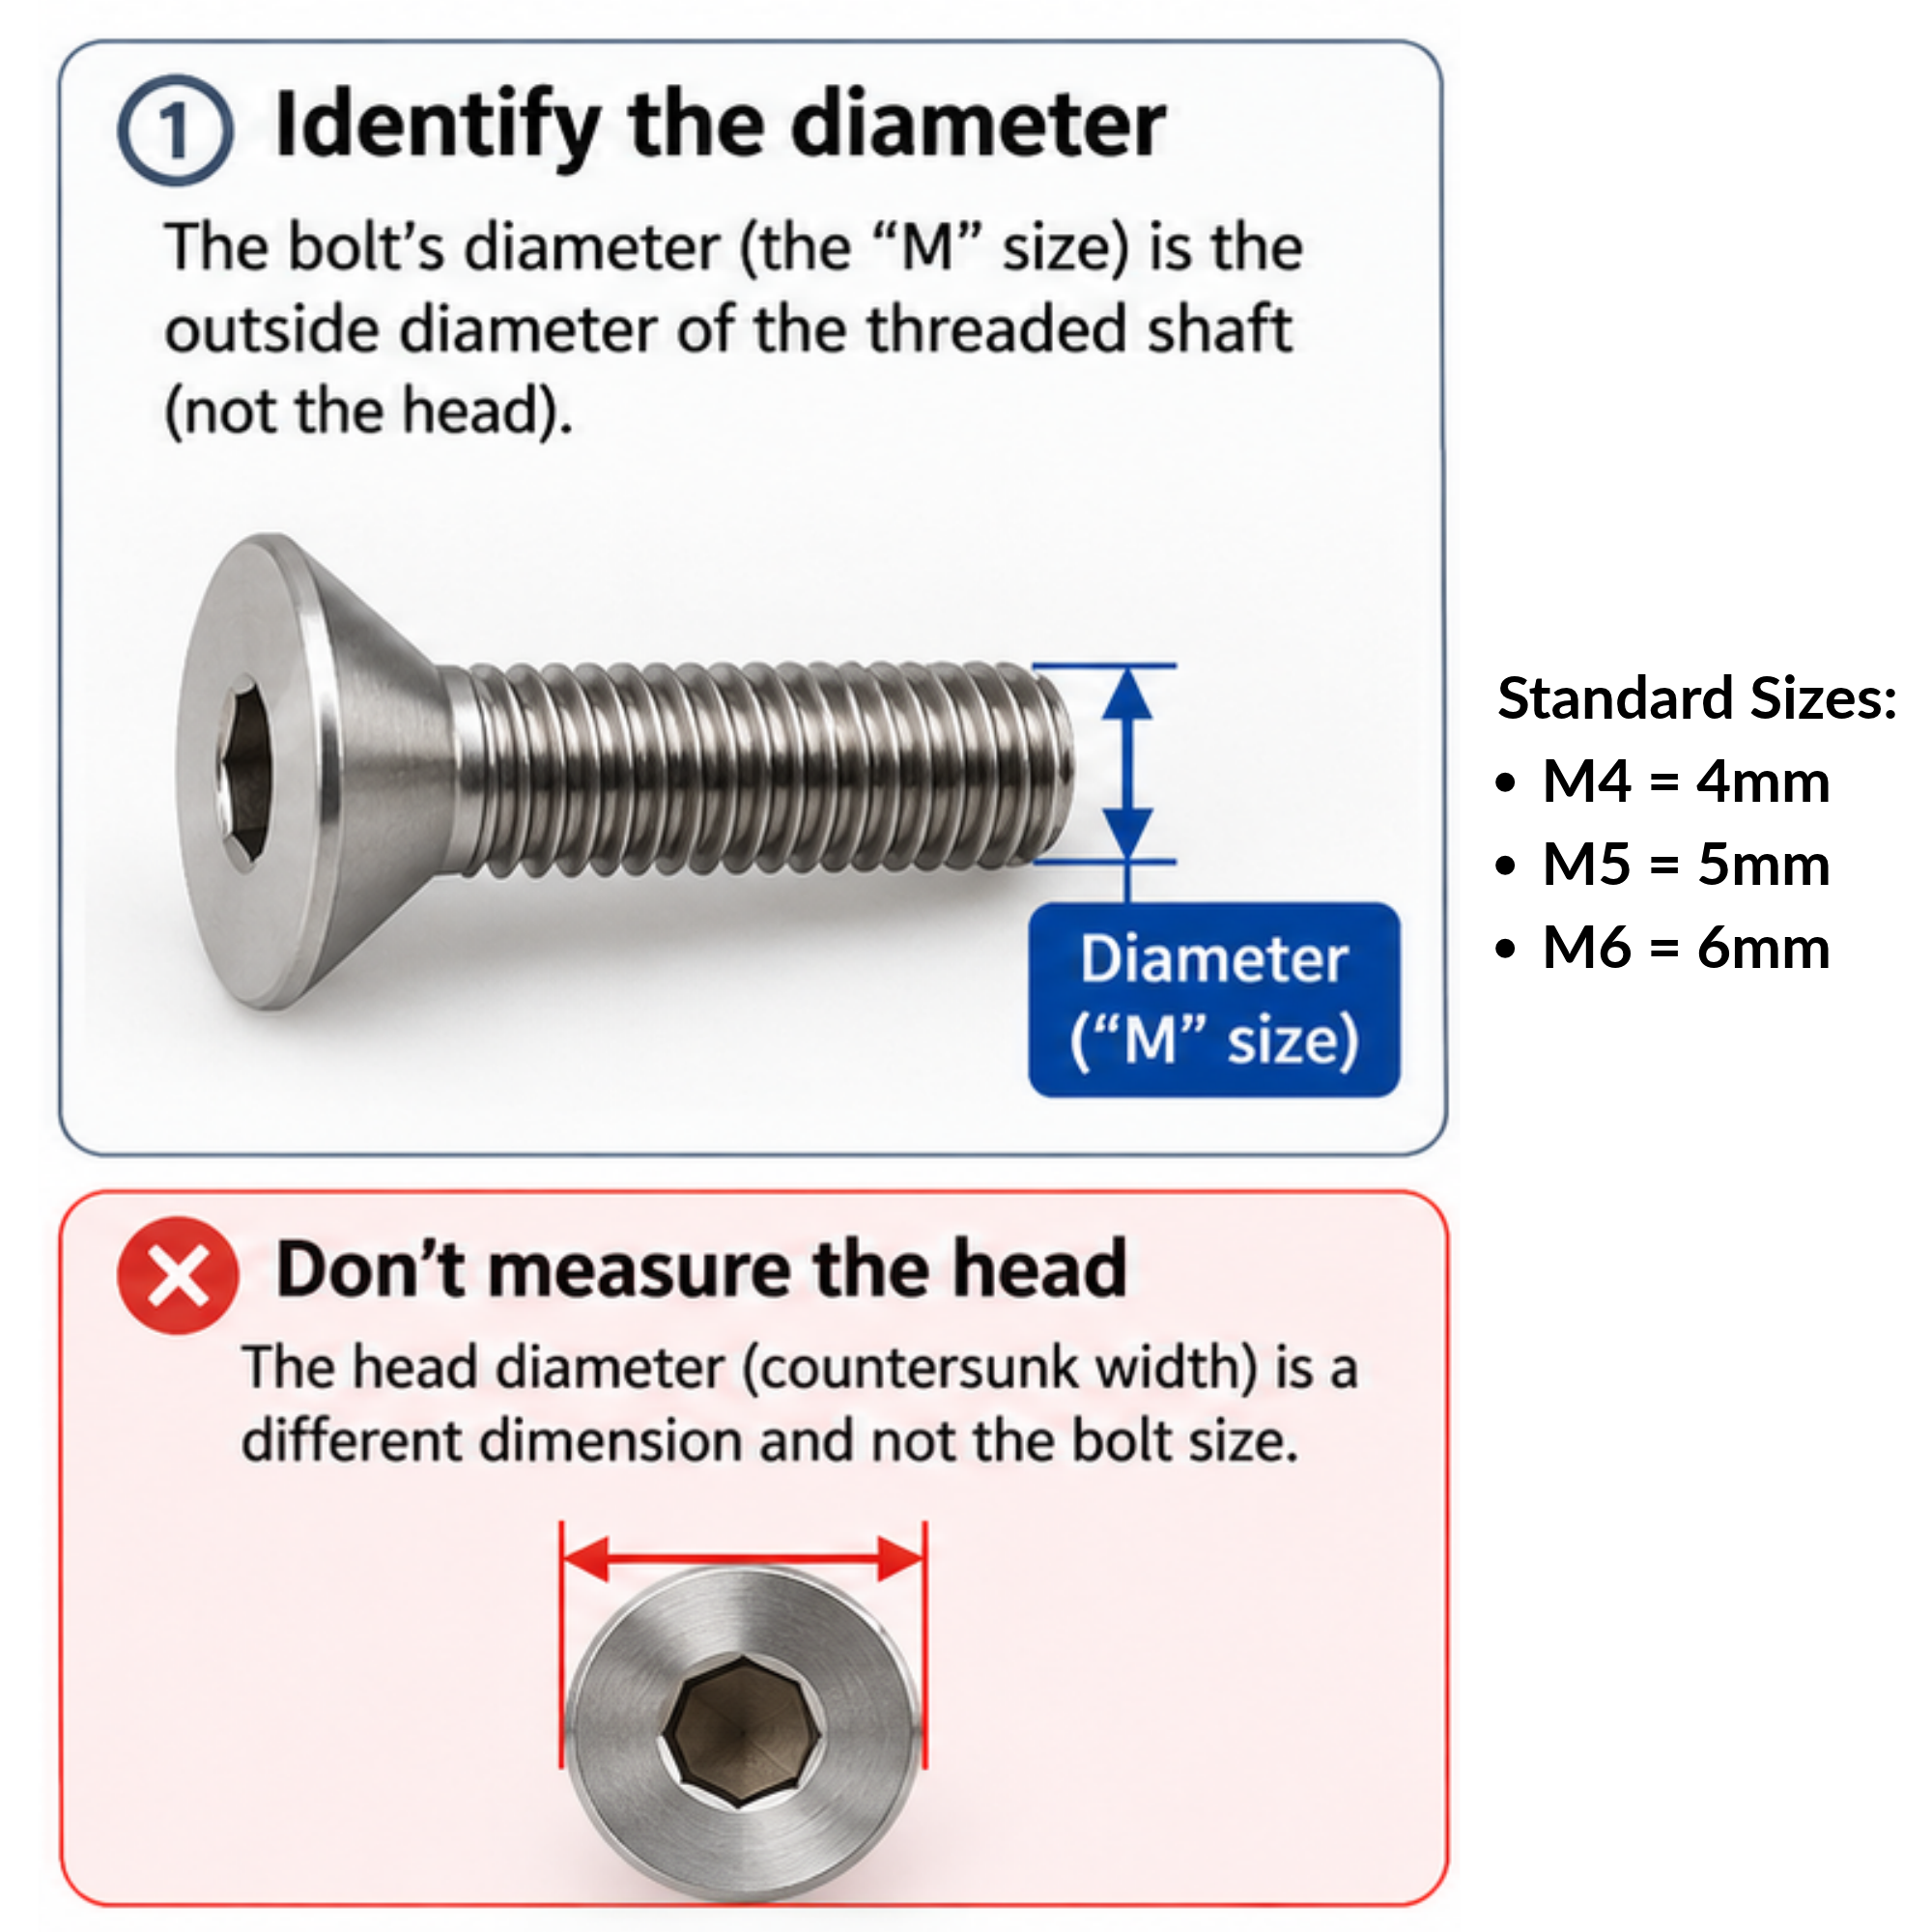
Identify the diameter of the bolts used to secure your existing arm cups to the cockpit.
The bolt diameter refers to the outside diameter of the threaded shaft, not the bolt head.
Common sizes include:
M4 — 4 mm
M5 — 5 mm
M6 — 6 mm
Remove an existing arm cup mounting bolt where appropriate and measure
the threaded section using a vernier caliper, or confirm the bolt specification
with the bicycle manufacturer.
Do not measure the bolt head.
Select the correct bolt diameter when completing your order.
Reference Illustration: Mounting Bolt Diameter
2. Forearm & Hand Reference Points — A, B & C
Three reference points are used to establish your forearm and grip geometry.
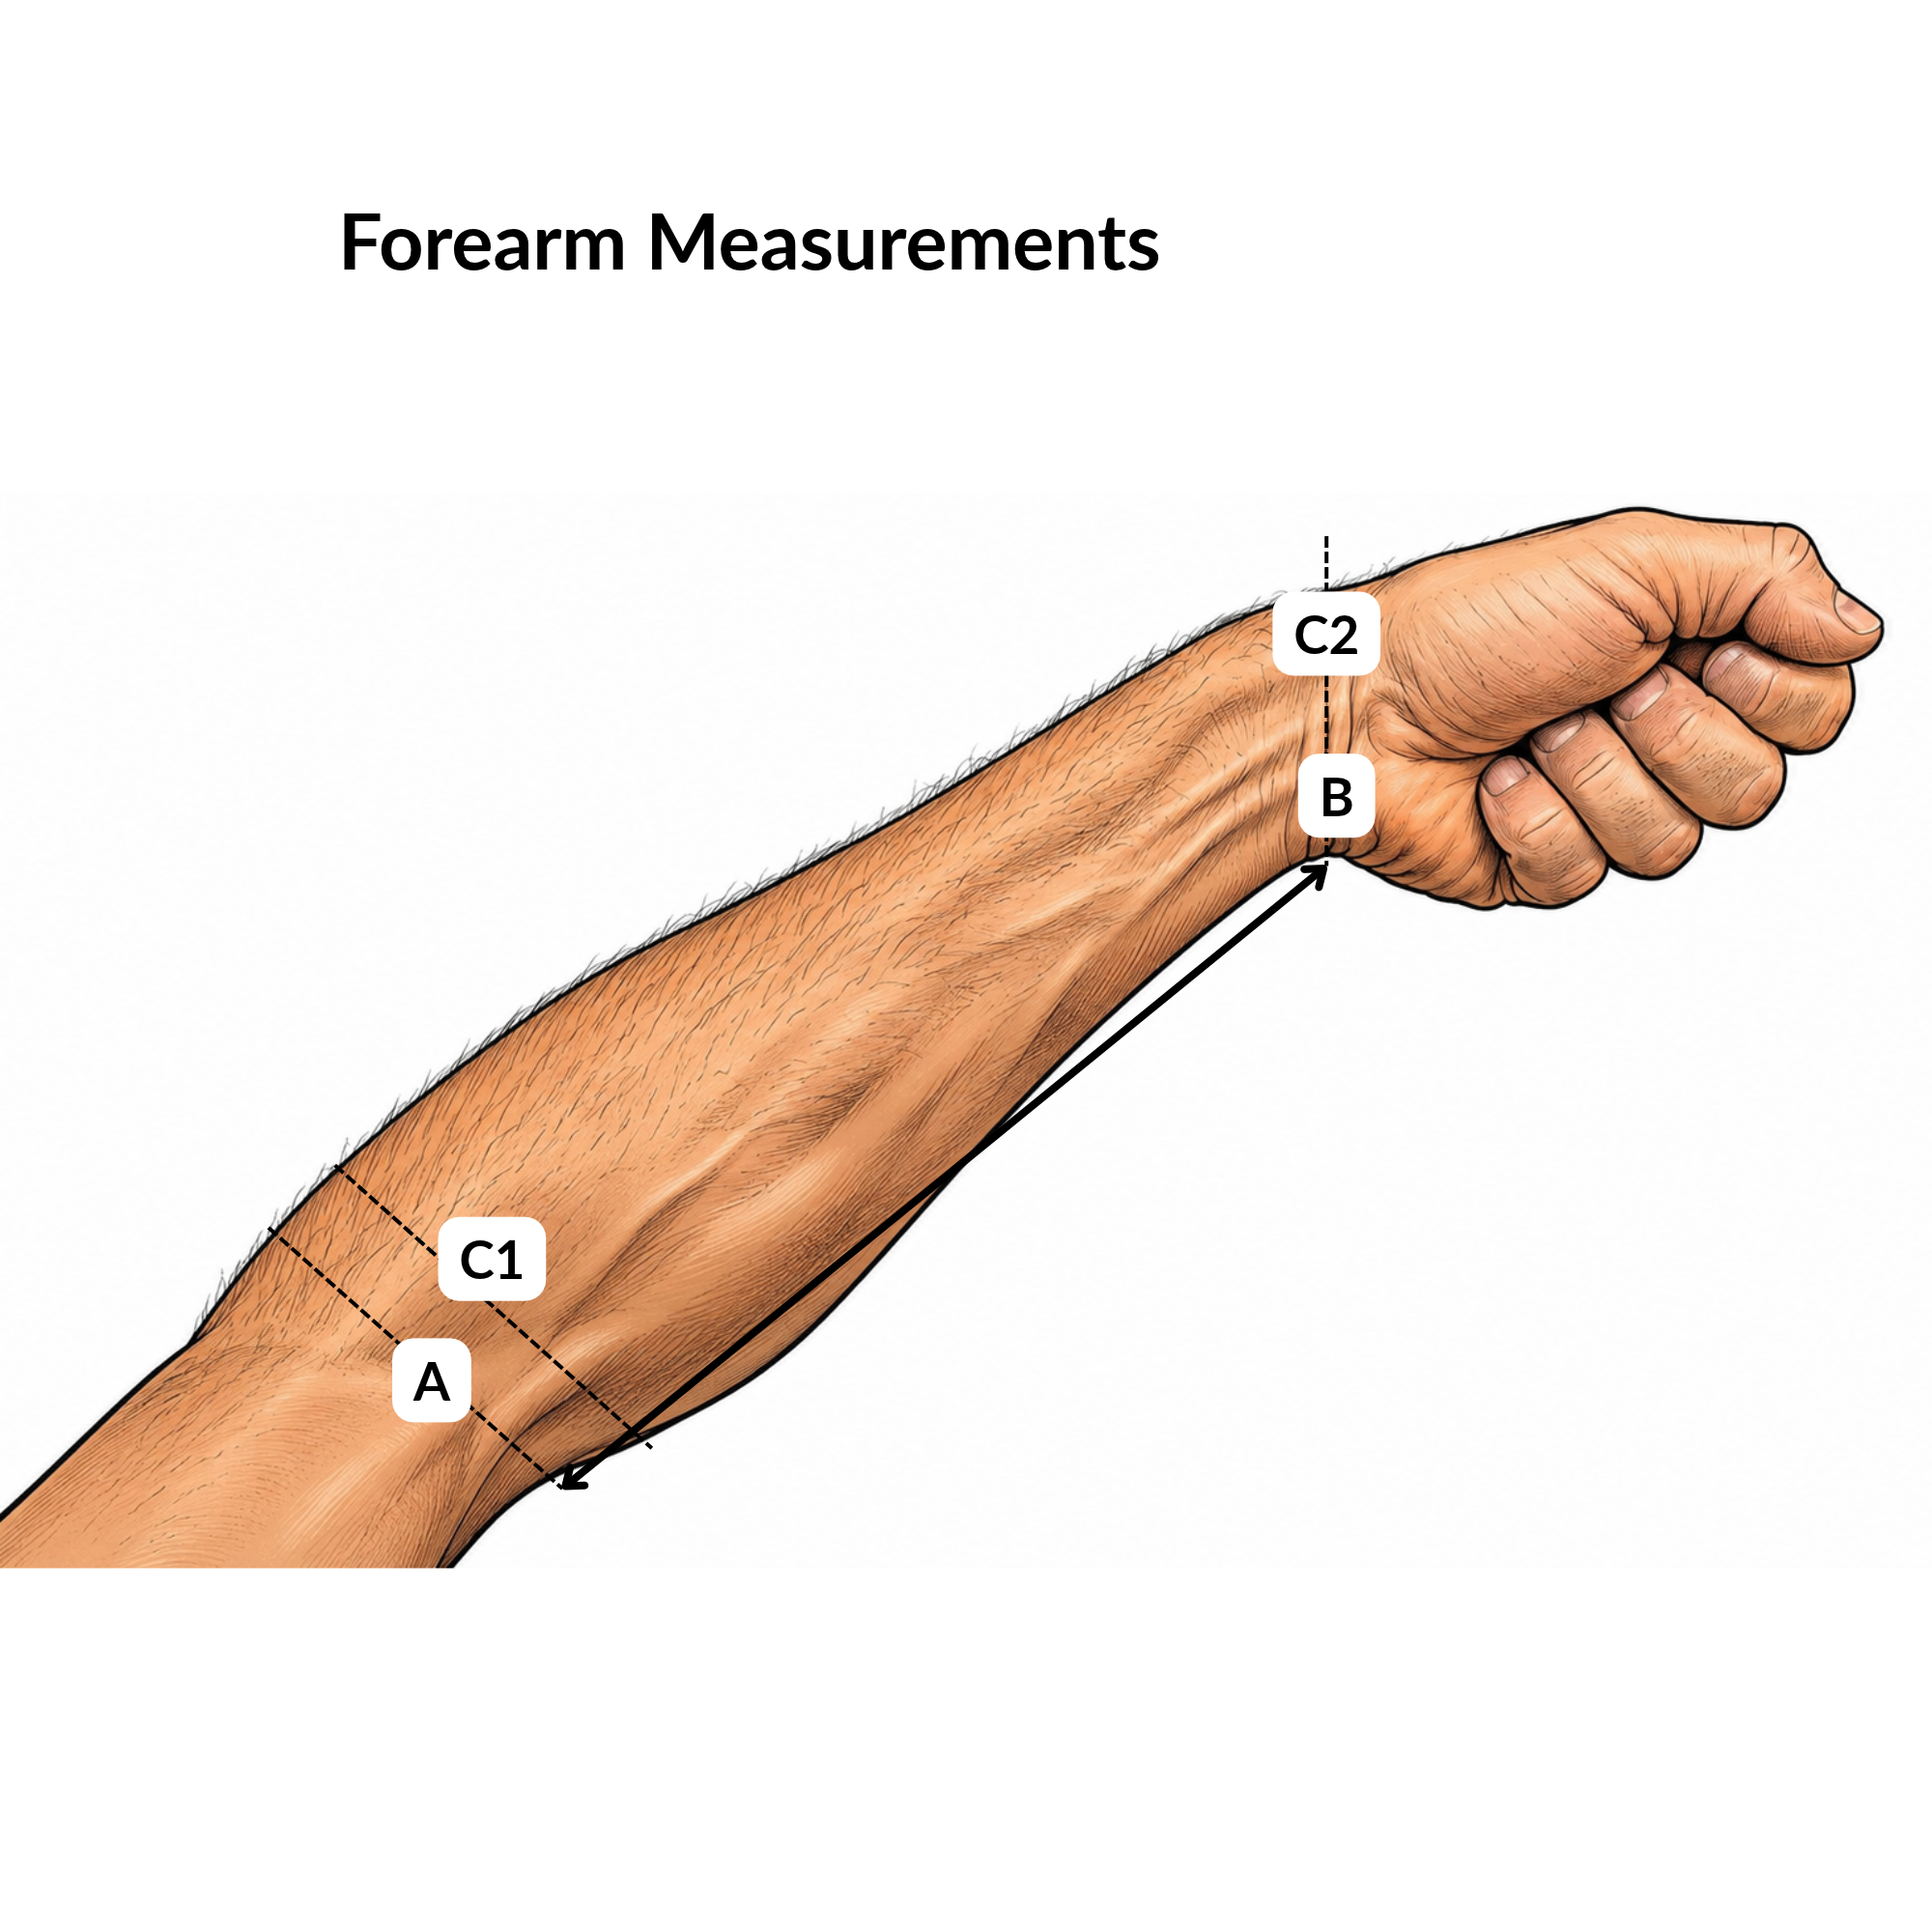
Point A — Elbow
The elbow reference point at the rear of your forearm support area.
Point B — Wrist
The wrist reference point, where your forearm transitions into your hand.
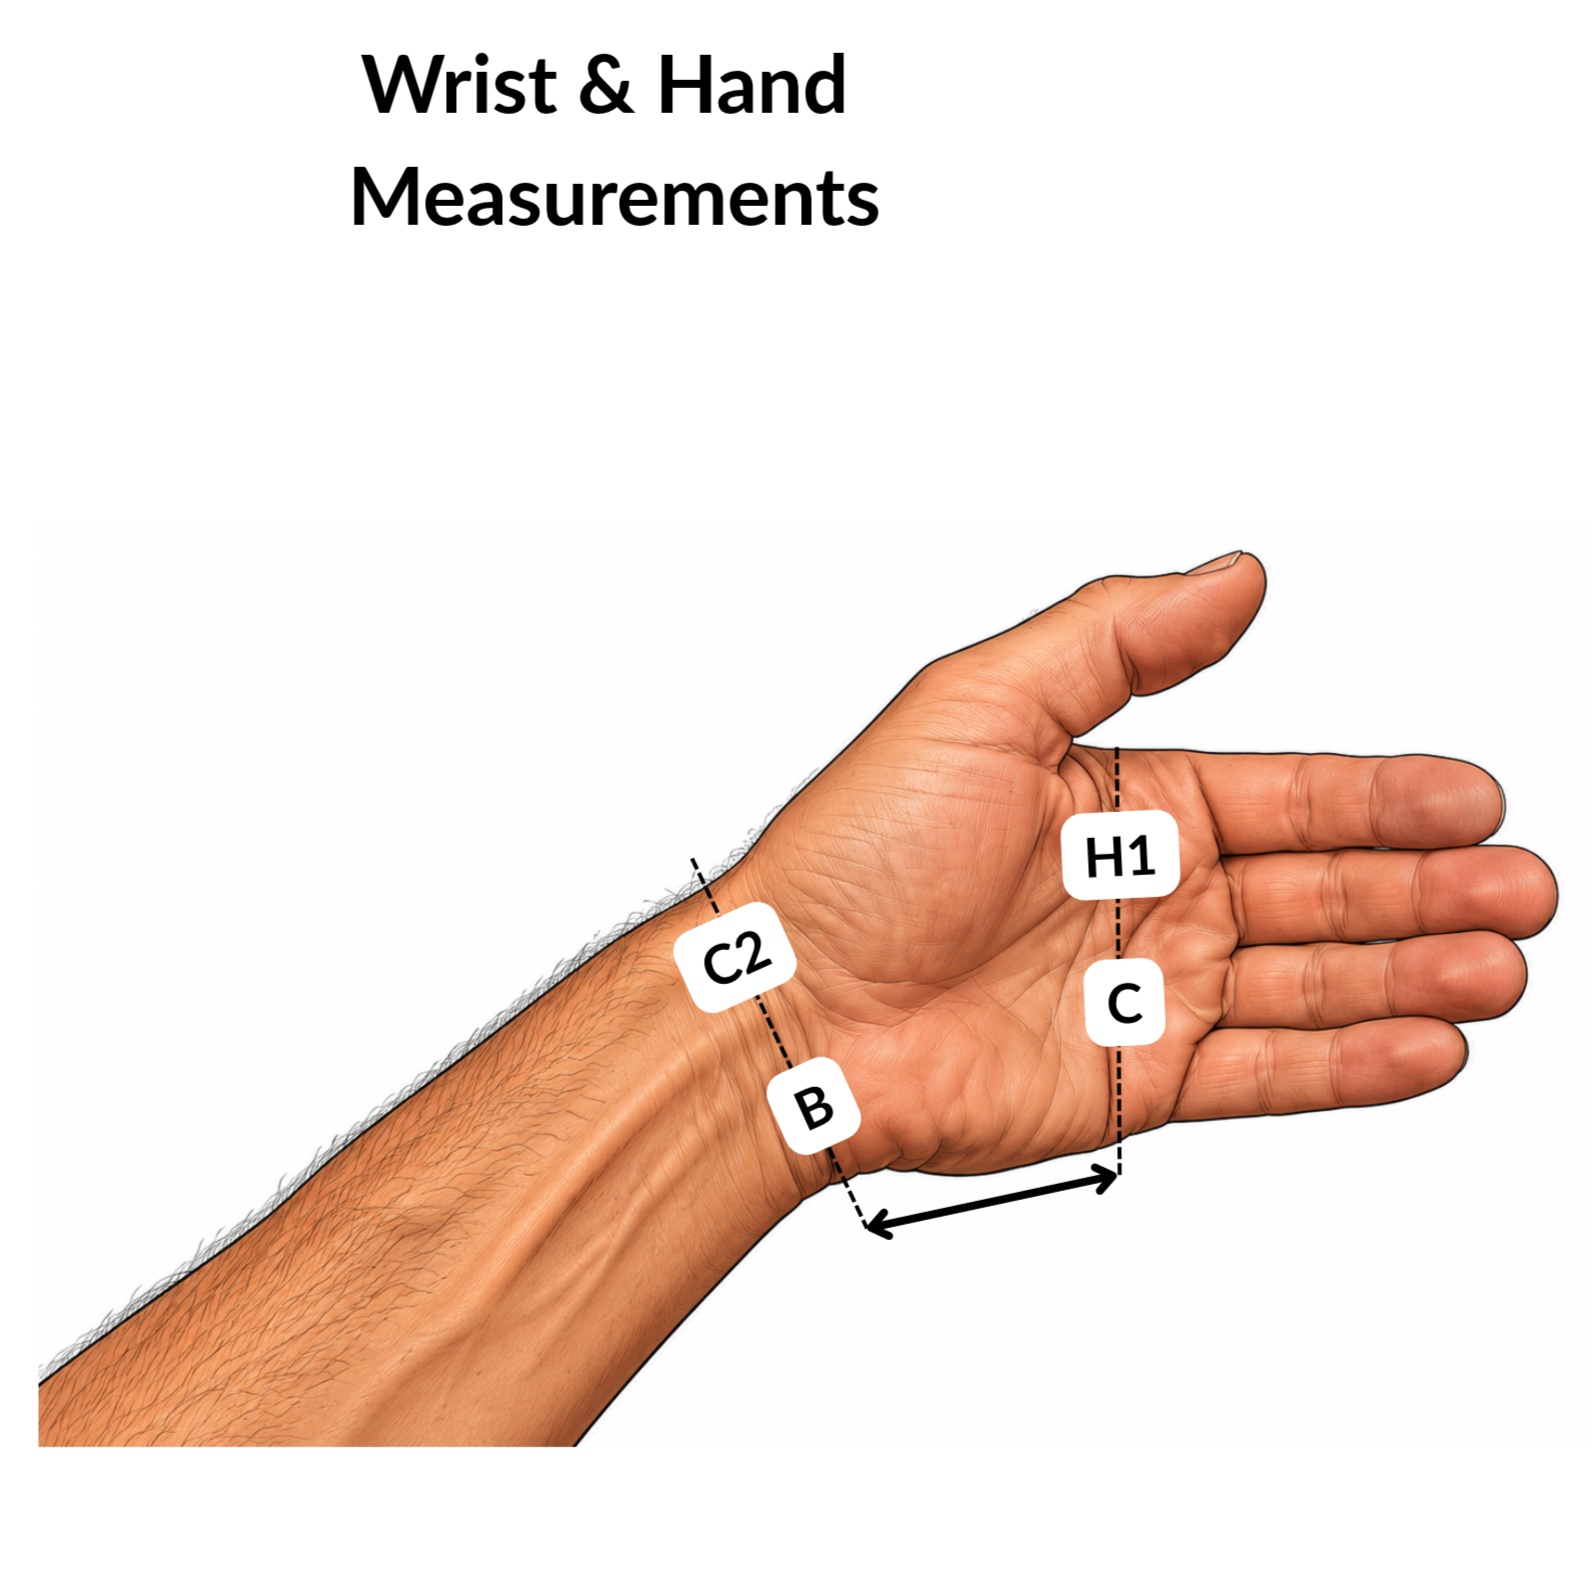
Point C — Centre of Palm
The centre of your palm when holding your hand in your preferred grip position, with your fist closed as though holding the cockpit extension.
These three points are used to determine the overall length and positioning of your custom cockpit.
A–B — Forearm Length
Measure the distance from Point A (elbow) to Point B (wrist).
Keep your forearm in a natural position and measure along the forearm between the two reference points.
Record the distance in millimetres.
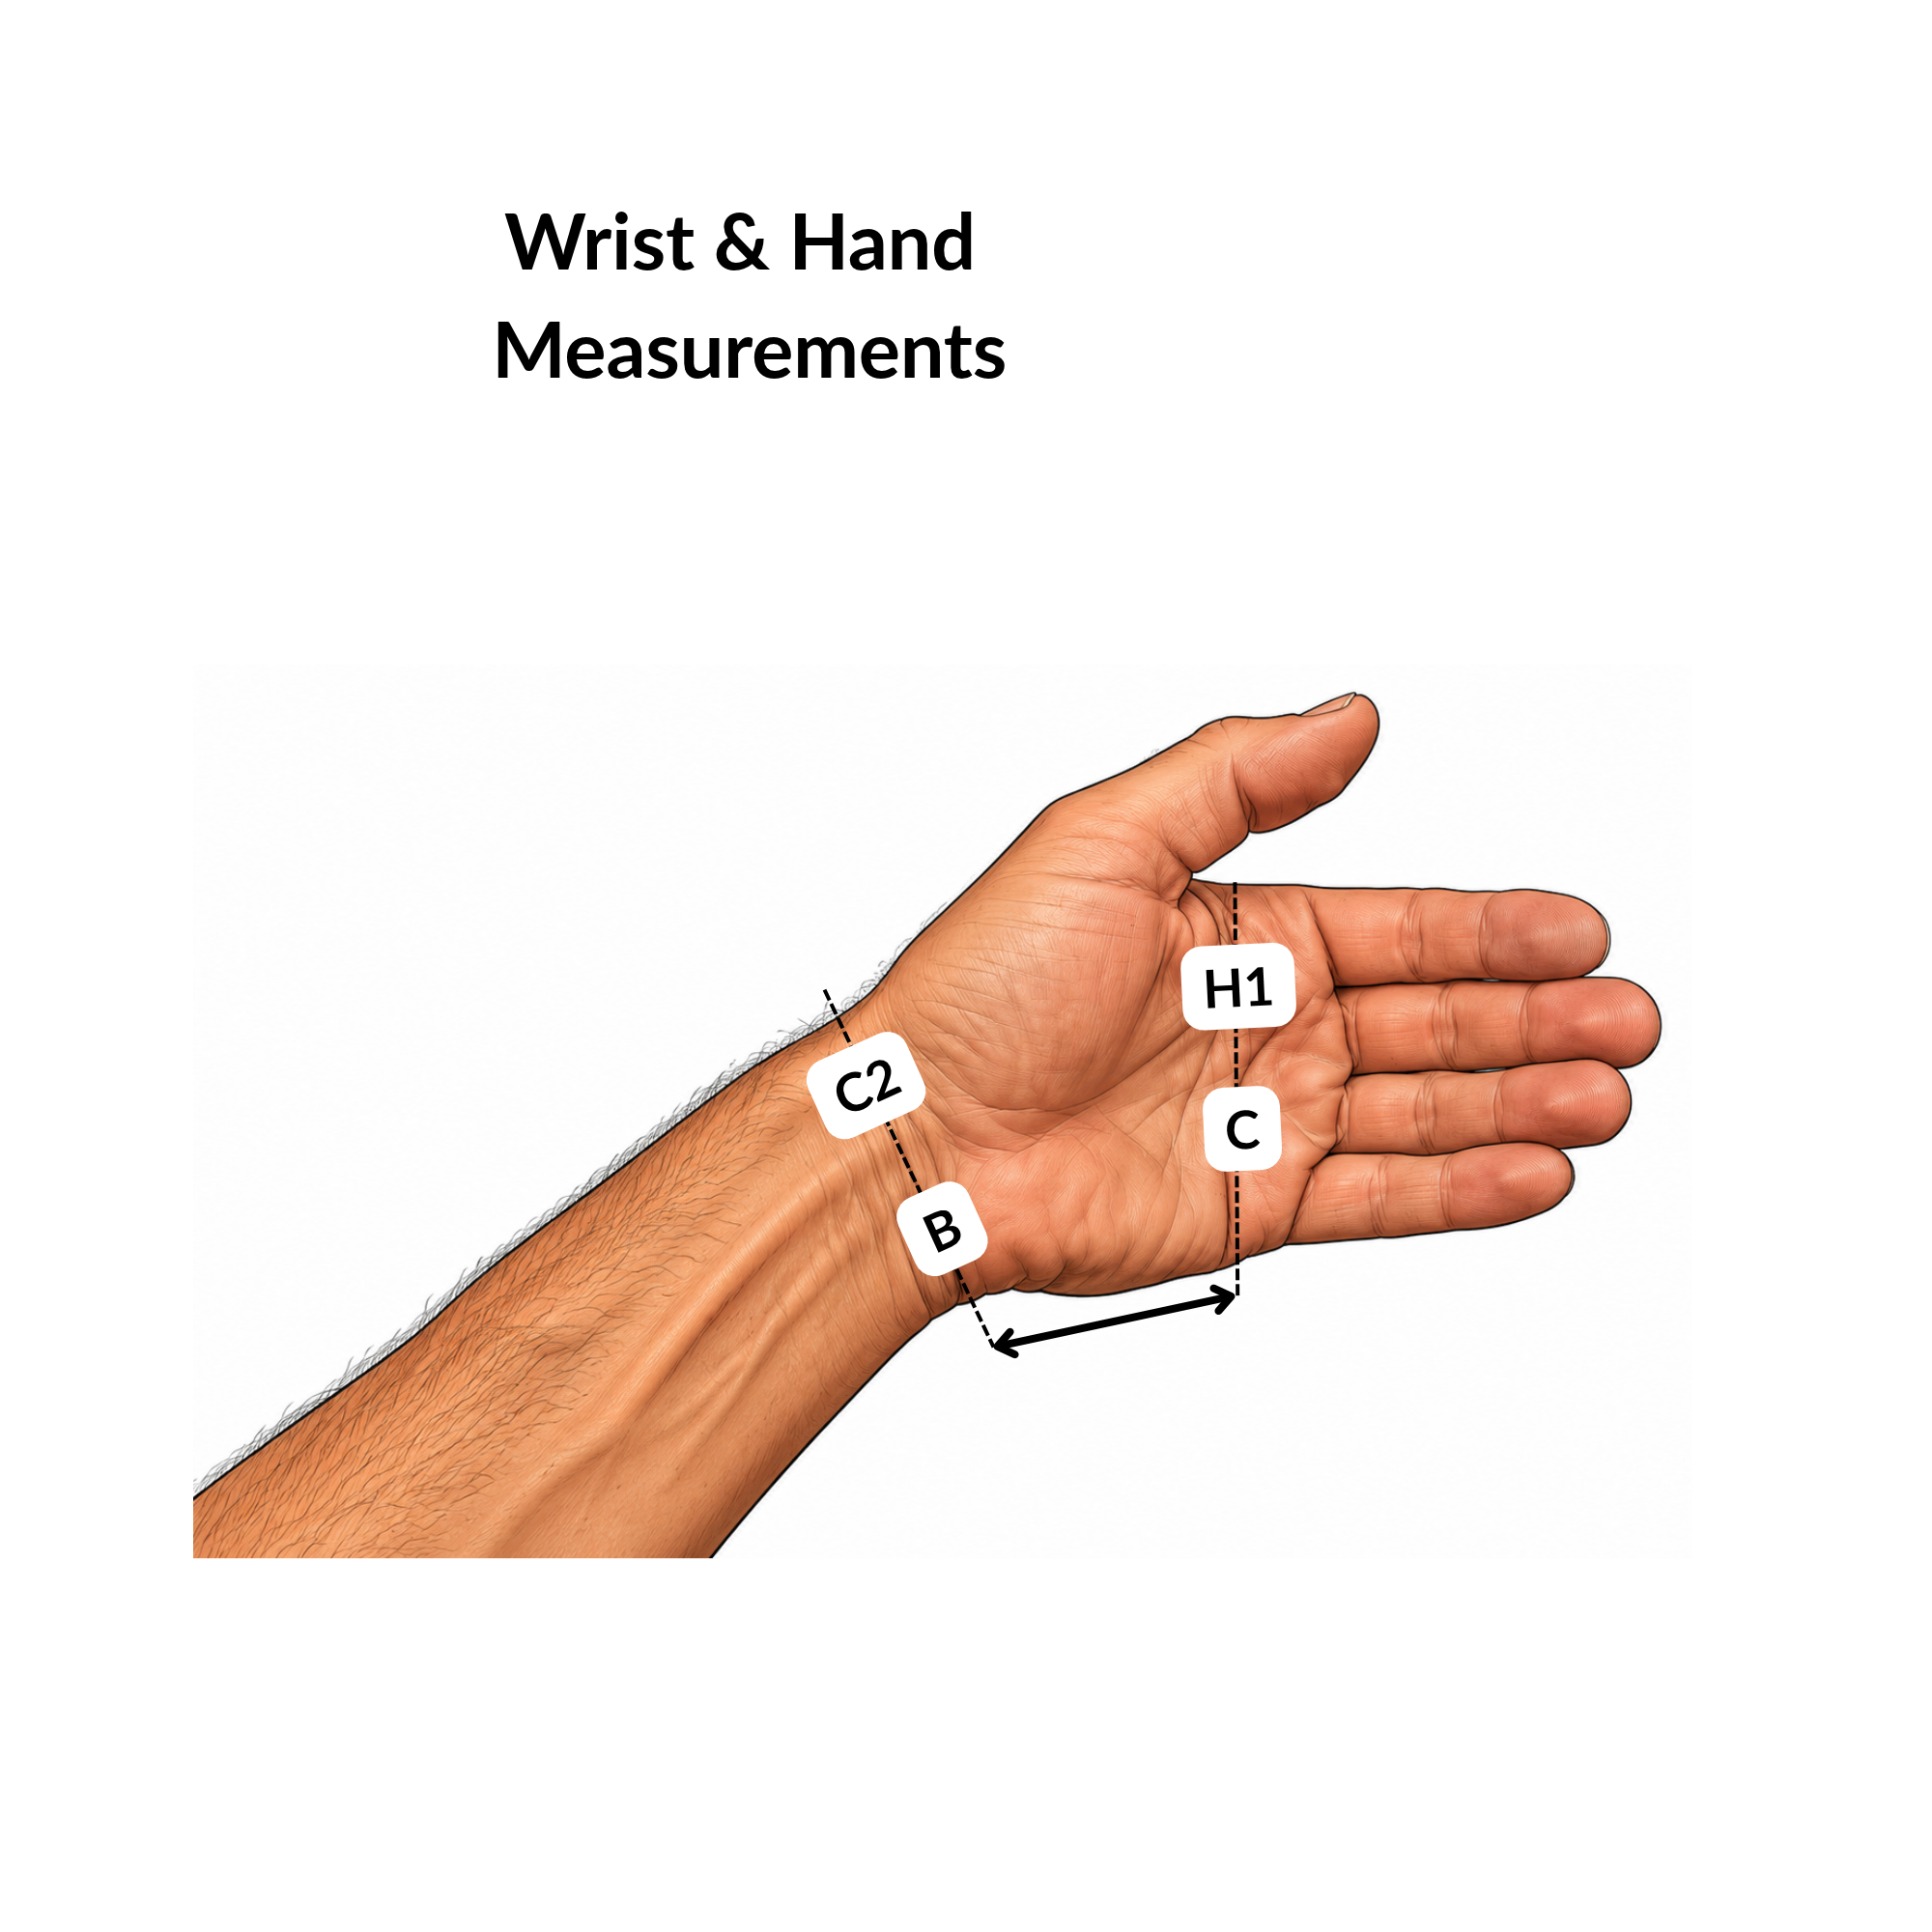
B–C — Grip Length
Measure the distance from Point B (wrist) to Point C (centre of palm).
Position your hand as though holding your preferred extension grip.
Record the distance in millimetres.
Reference Illustrations: Forearm Measurements and Wrist & Hand Measurements
4. Hand Height — H1
Measurement: H1
This measurement is used to establish the dimensions of the hand and grip area.
Measure the relevant hand dimension at the position indicated in the Hand
Measurement illustration.
Record the measurement in millimetres.
Reference Illustration: Wrist & Hand Measurements
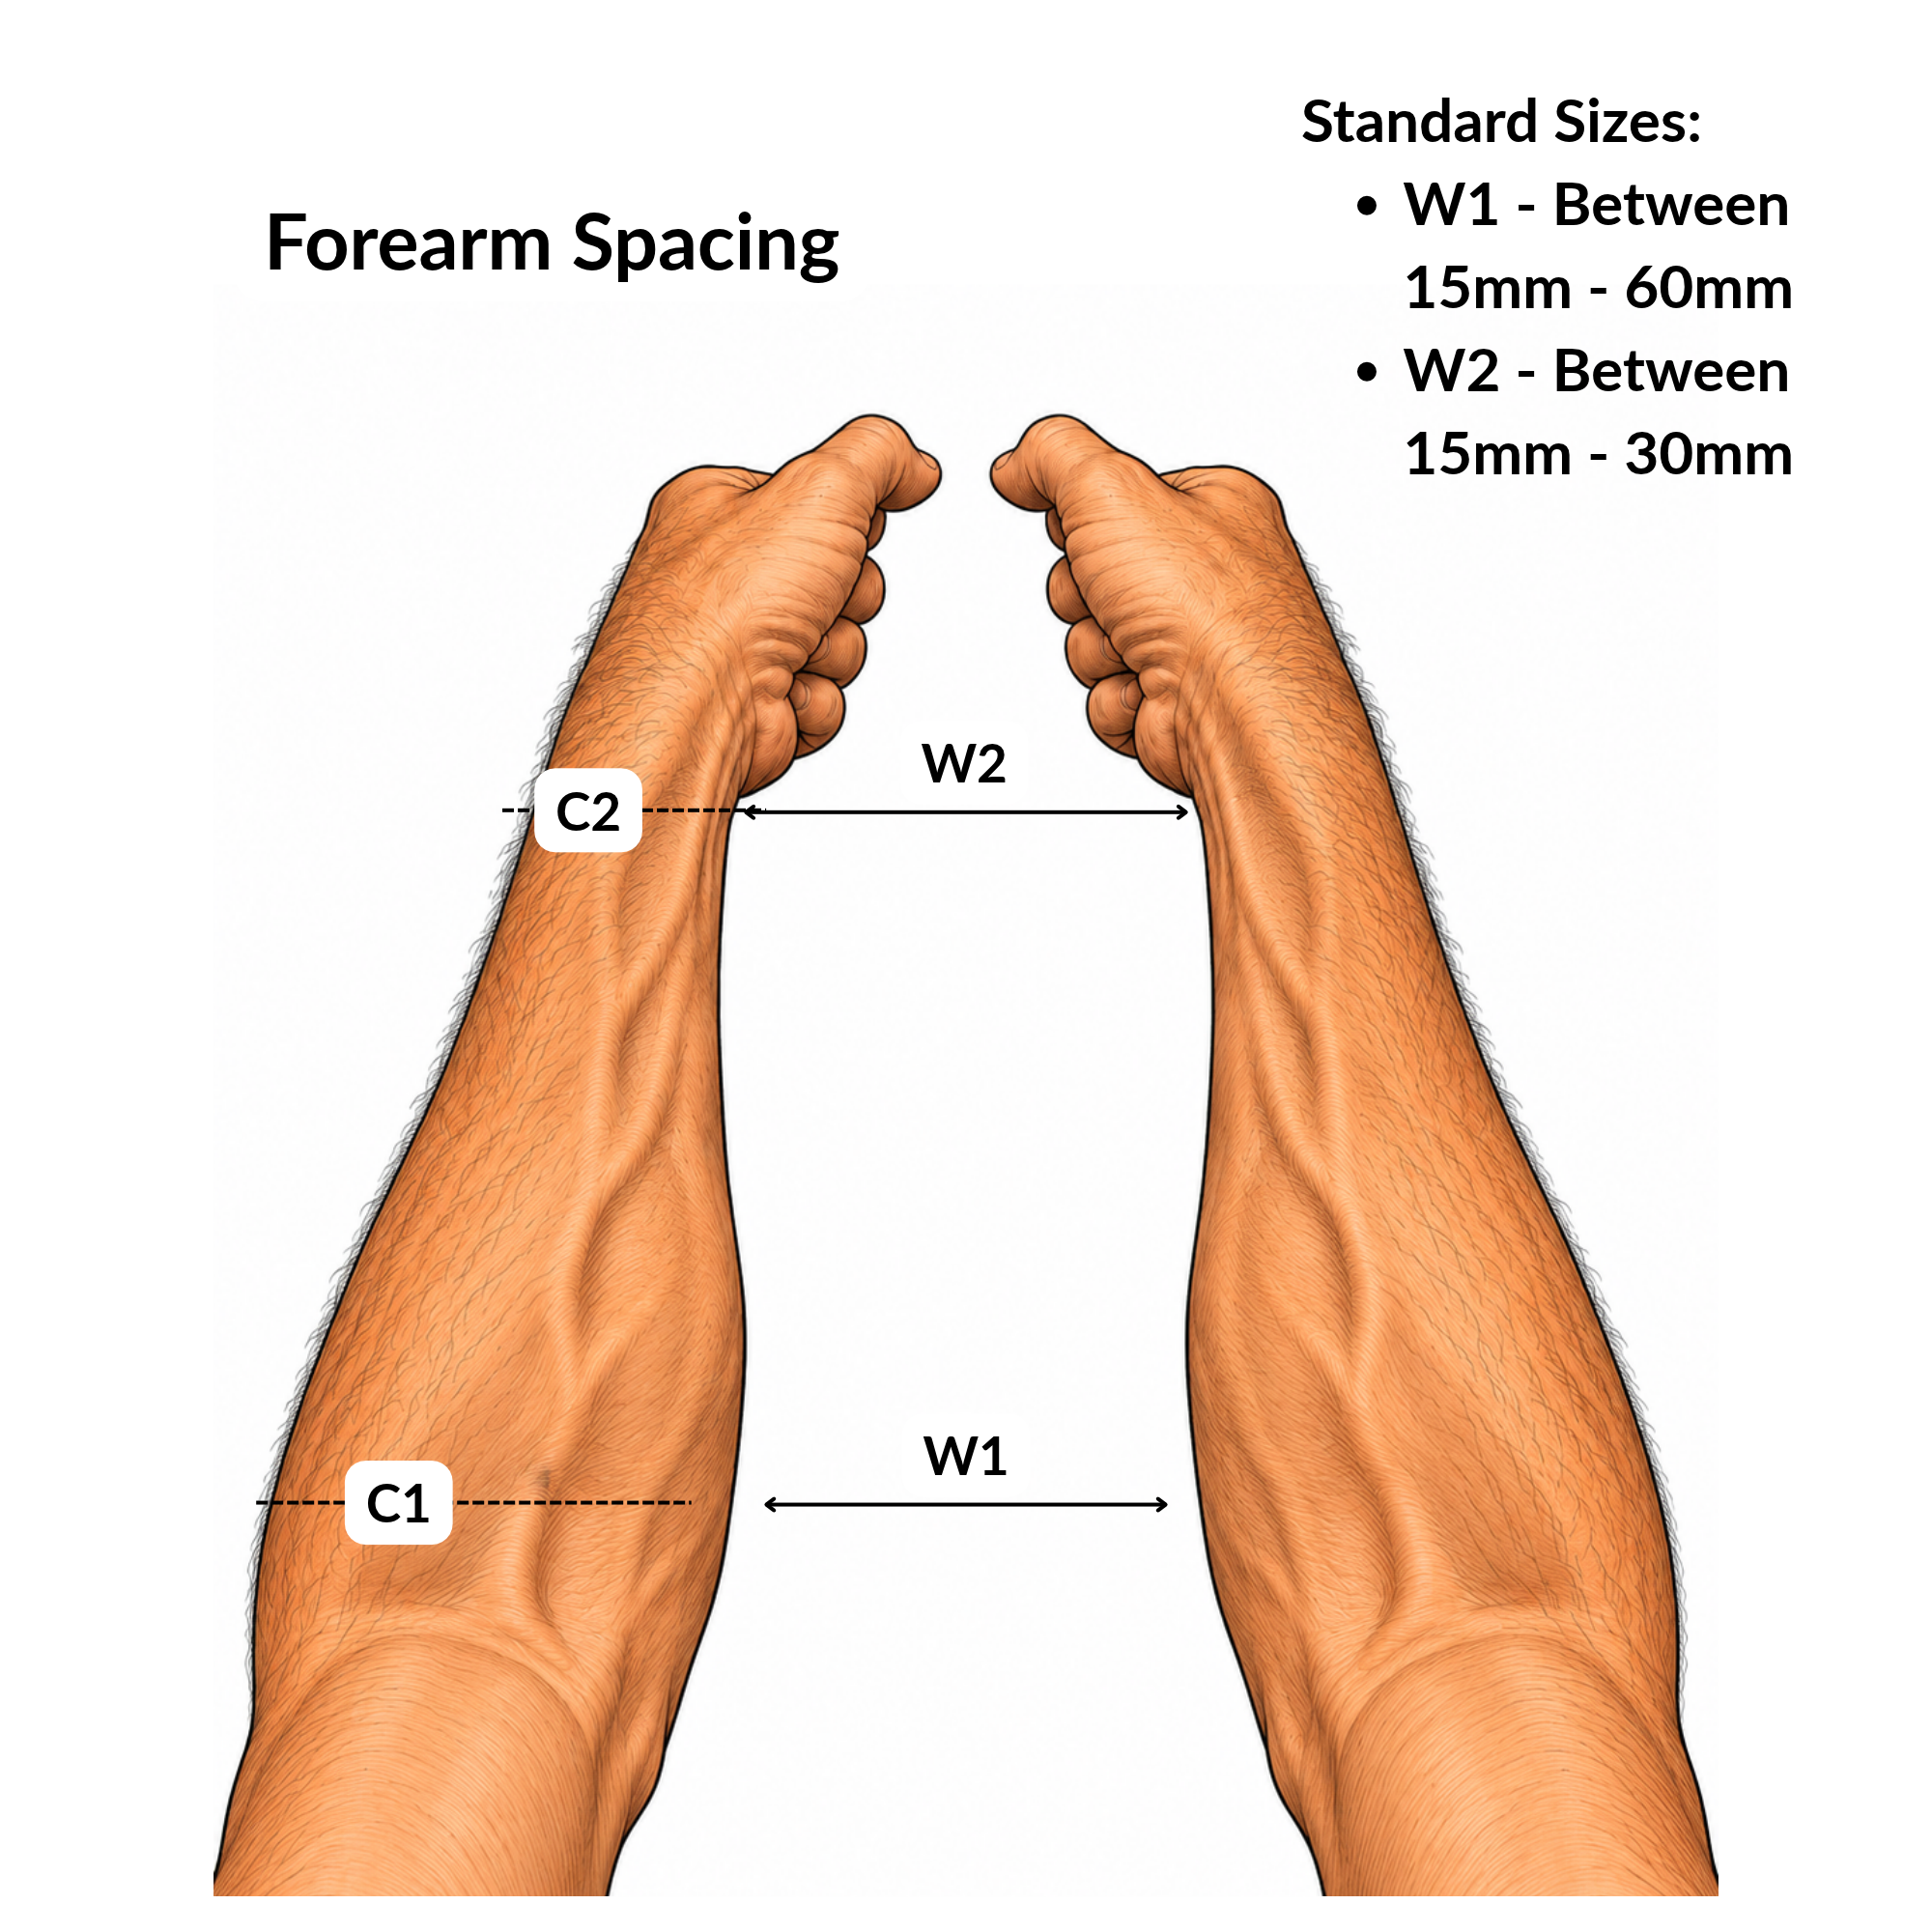
5. Forearm Spacing — W1 & W2
These measurements establish the spacing between your left and right forearms when riding in your preferred aerodynamic position.
For best results, complete these measurements while positioned on your bicycle, or while accurately reproducing your existing bike fit.
Maintain your normal elbow, wrist and hand positions.
W1 — Elbow Forearm Spacing
Measure the clear distance between the inside edges of your left and right forearms near the elbows, at the C1 reference location.
Reference range: 15–60 mm
Record the distance in millimetres.
W2 — Wrist Forearm Spacing
Measure the clear distance between the inside edges of your left and right forearms near the wrists, at the C2 reference location.
Reference range: 15–30 mm
Record the distance in millimetres.
Important: These are inside-edge-to-inside-edge measurements, not centre-to-centre measurements.
The stated ranges are standard reference sizes. If your preferred position falls outside these ranges, contact SlipStream 3D to discuss your requirements before ordering.
Reference Illustration: Forearm Spacing
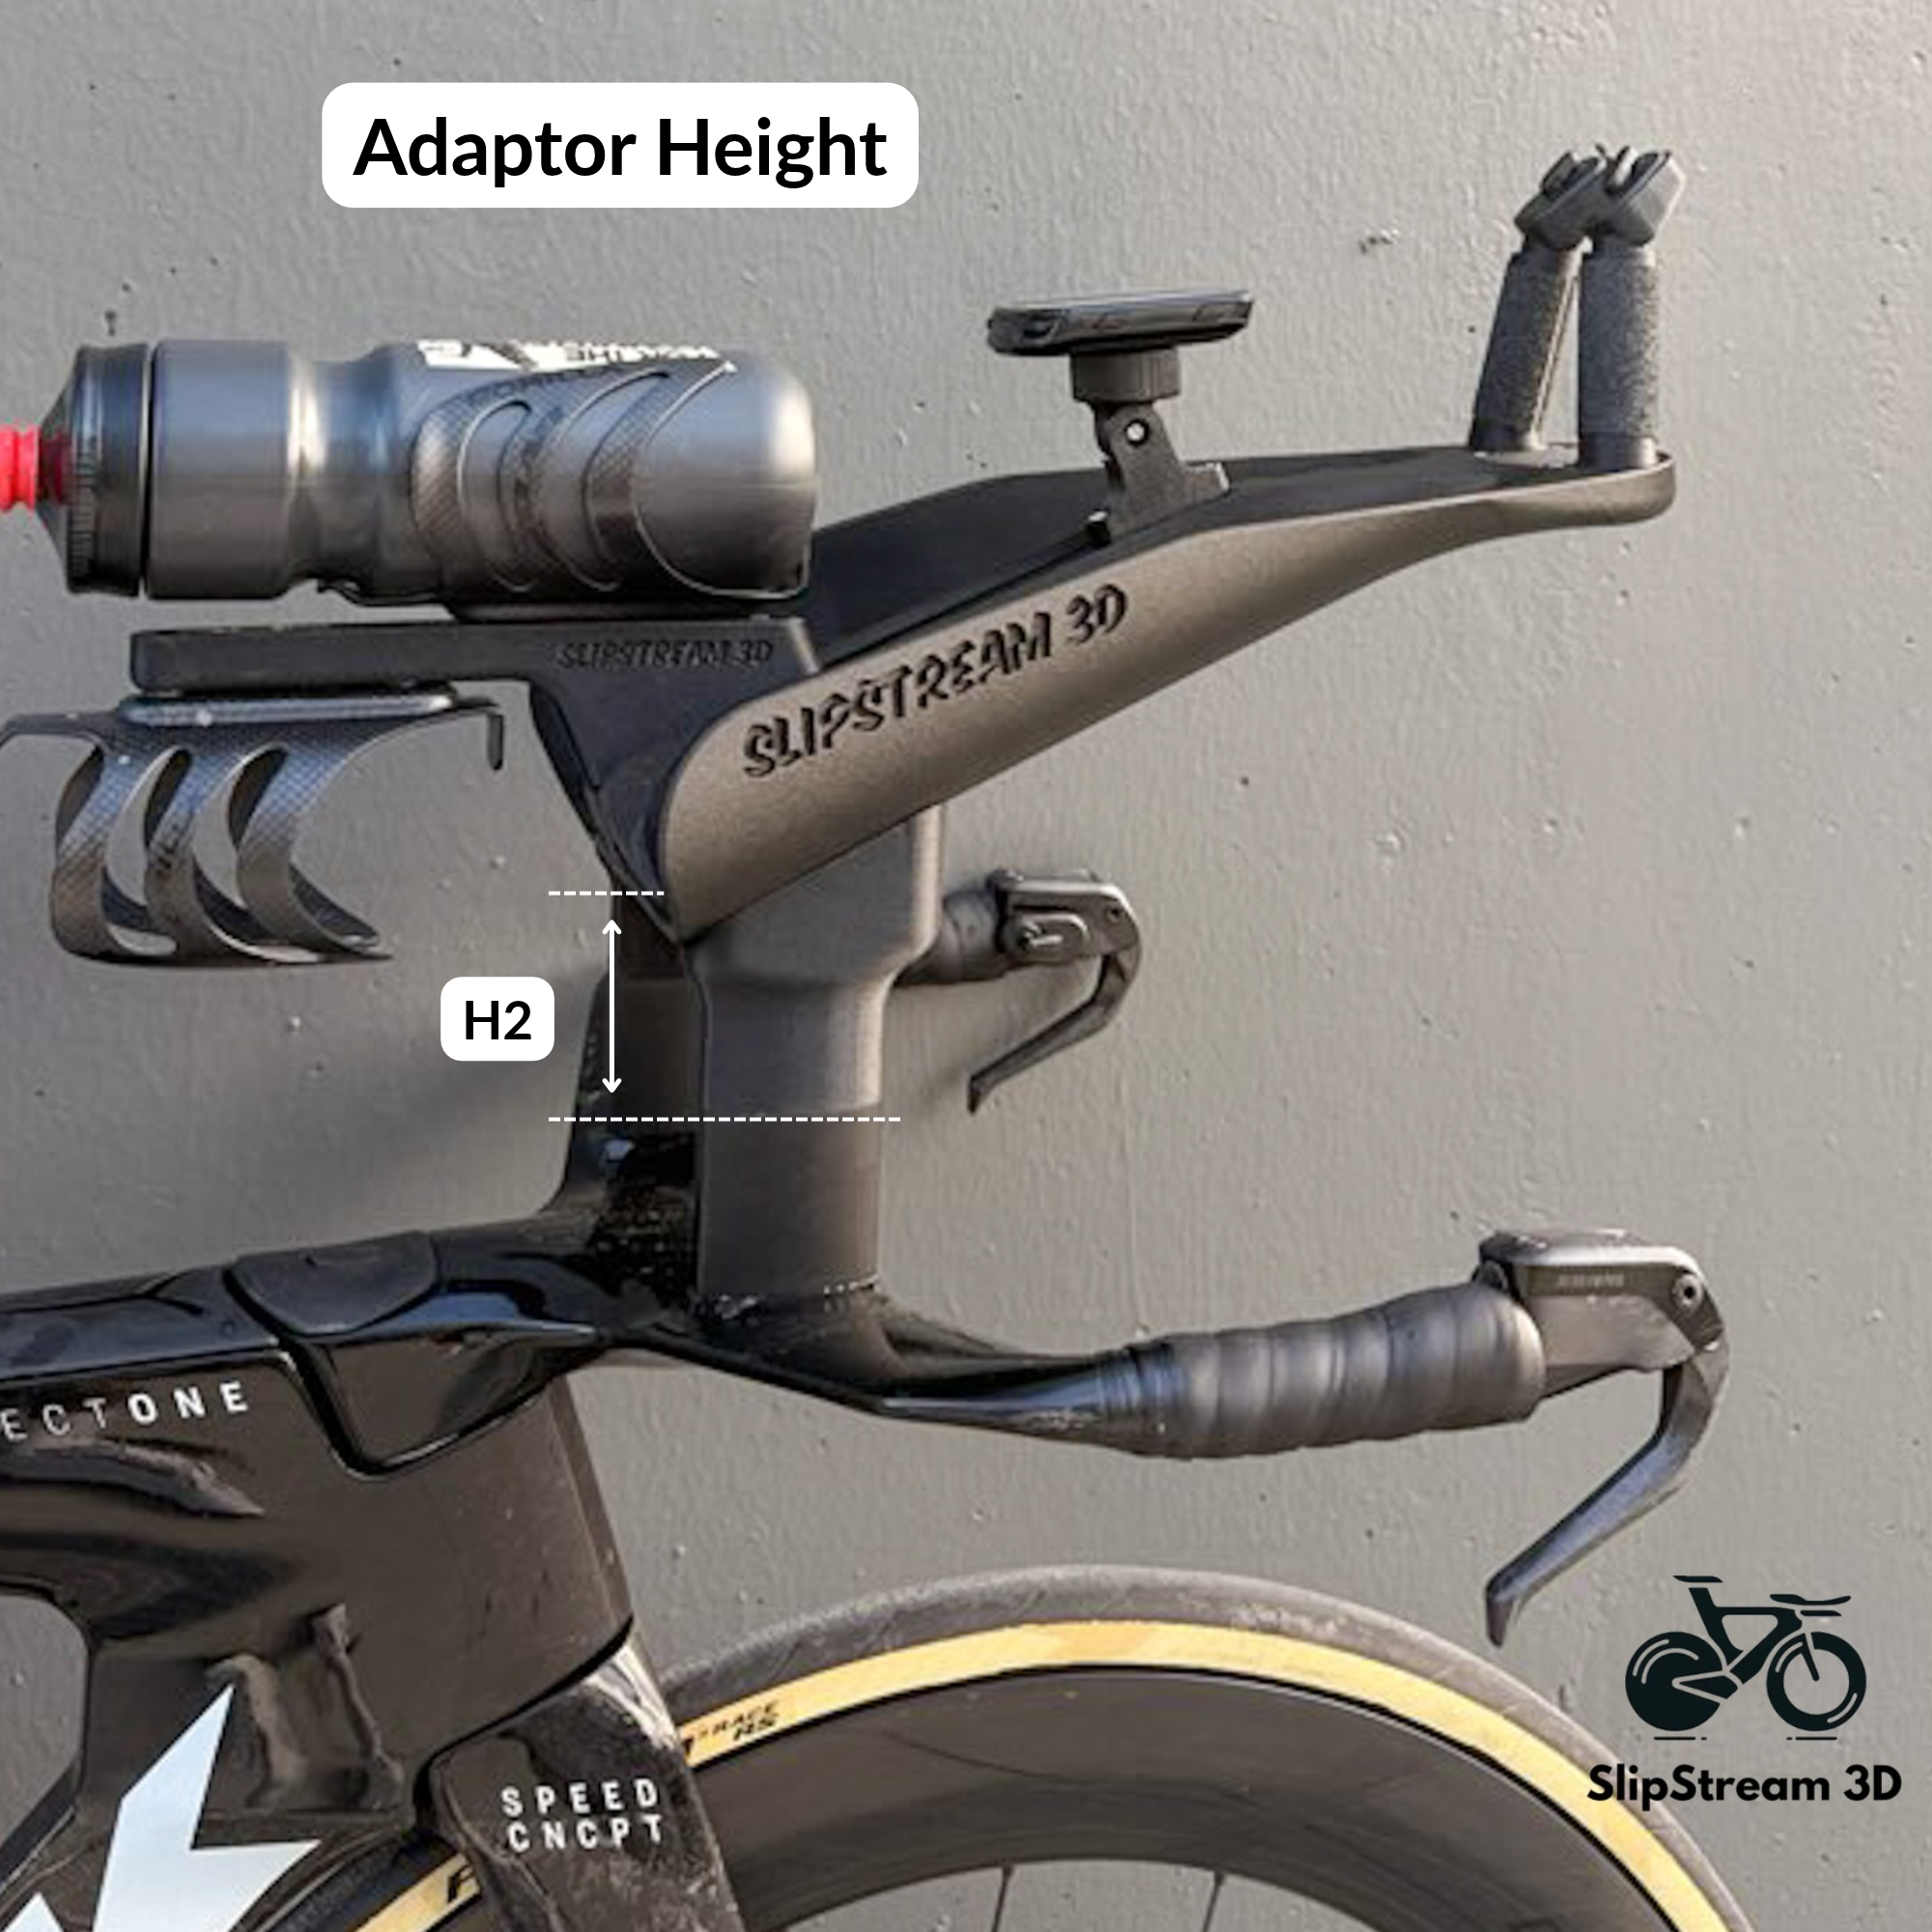
6. Adaptor Height — H2
Trek Speed Concept Gen 3 Only
This measurement determines the required vertical height of your cockpit adaptor and establishes the desired arm pad height for your new SlipStream ONE cockpit.
How to Measure
Locate the lower reference point at the top of the Trek spacer, as indicated in the Adaptor Height illustration.
Measure the vertical distance from the top of the Trek spacer to your desired arm pad height.
Ensure the measurement is taken vertically, not at an angle.
Record your measurement in millimetres (mm).
Important: If you wish to maintain your existing arm pad height, measure to its current position. Alternatively, you can specify a different height to suit your preferred riding position.
Refer to the H2 – Adaptor Height illustration.
7. Bar Angle — BA
IF you know an angle already, skip this step.
This measurement determines the upward angle of your cockpit in your preferred aerodynamic riding position.
How to Measure
Position your bicycle on a level surface.
Place a digital angle gauge or smartphone level along the upper surface of your existing arm cup, aligned with the direction of your forearm.
Measure the angle relative to horizontal.
Record the angle in degrees (°).
Angle Reference:
0° — Horizontal cockpit position.
Positive angle — Cockpit rises upwards towards your hands.
Important: Measure the angle that represents your preferred riding position, as this will be used to establish the geometry of your new SlipStream ONE cockpit.
A smartphone level or digital angle gauge can be used to obtain this measurement.
8. Final Measurement Checklist
Before submitting your order, ensure you have recorded:
BD – Mounting Bolt Diameter (M4 / M5 / M6 / Other)
A–B – Forearm Length: Elbow to Wrist (mm)
B–C – Grip Length: Wrist to Centre of Palm (mm)
C1 – Upper Forearm Circumference (mm)
C2 – Wrist Circumference (mm)
H1 – Hand Height (mm)
W1 – Spacing Between Forearms Near Elbows (mm)
W2 – Spacing Between Forearms Near Wrists (mm)
H2 – Adaptor Height: Top of Trek Spacer to Desired Arm Pad Height (mm)
BA – Bar Angle (°)
Where requested, provide individual measurements for your left and right arms.
Please double-check every measurement before submitting your order.
9. Submitting Your Measurements
Once you have completed the measurement process:
Return to your selected SS ONE product page.
Select your preferred cockpit configuration and accessories.
Enter your measurements into the corresponding checkout fields.
Provide any requested bicycle compatibility information or reference photographs.
Review and confirm your measurements before completing your order.
SlipStream 3D may contact you if additional information or clarification is required.
Important — Custom Manufacturing
Every SS ONE cockpit is individually designed and manufactured using the measurements supplied by the customer.
Incorrect measurements may affect the fit, comfort, positioning or compatibility of the finished product.
Please ensure your measurements accurately reflect your intended riding position before placing your order.
Any changes requested after design or production has commenced may incur additional charges.
Estimated lead time: Approximately 4 weeks to dispatch, commencing once all measurements, configuration details and compatibility information have been confirmed.
All custom products remain subject to our Custom Product Disclaimer, Safety Information and applicable Australian Consumer Law guarantees.